As I noted in my earlier post on “Reality vs Photography,” my non-camera-savvy friends often ask if I “cheated” in processing to get my beautiful results. I hope I debunked the whole idea of cheating there, but more knowledgeable yet less experienced photographers often ask the obvious corollary question: “How did you get those results?” So what follows is a summary of the basic post processing steps that I take with almost every image that I shoot.
Some more complicated procedures that I nearly alway employ in addition to these basics may merit a future blog post if I don’t get run out of town for posting this one. It should also be stated right up front that at least some of what follows applies only to camera RAW files and I’ll note that as I go along. But even the bulk of it that does apply to JPEGs as well will be more effective when used with RAW image files.
We also have to specify that I’m a Lightroom nerd, and everything here is related to post processing in that software. We’ll refer hereinafter to Lightroom as LR. As alternatives, I’ve only used Picasa and Microsoft’s old Photo Editor app. While you could do some of what I’m going to describe here in those packages, they were quite a bit more primitive. I would hazard a guess, since Adobe kind of establishes standards in this arena, that newer competitors to LR can probably achieve most or all of these techniques, so if you use something other than Lightroom, you can likely adapt the steps discussed here to your own software. 
So, let’s talk about workflow. The first thing that happens with a new set of in-camera images is that they get imported into LR. And right out of the gate I apply a set of modifications that I’ve stored as a preset. I’ve cleverly named that preset “Import Standard.” To apply it during import, you just select it in the Import panel “Apply During Import” section, as shown at right. For LR noobs, getting to this panel is from the Library module and the Import button at the lower left corner of the screen.
So what do I include in my import preset? Working down from the top of the Develop module panel on the right side of the LR window, the screenshots below show, with red arrows, each of the items that I’ve changed from LR defaults.
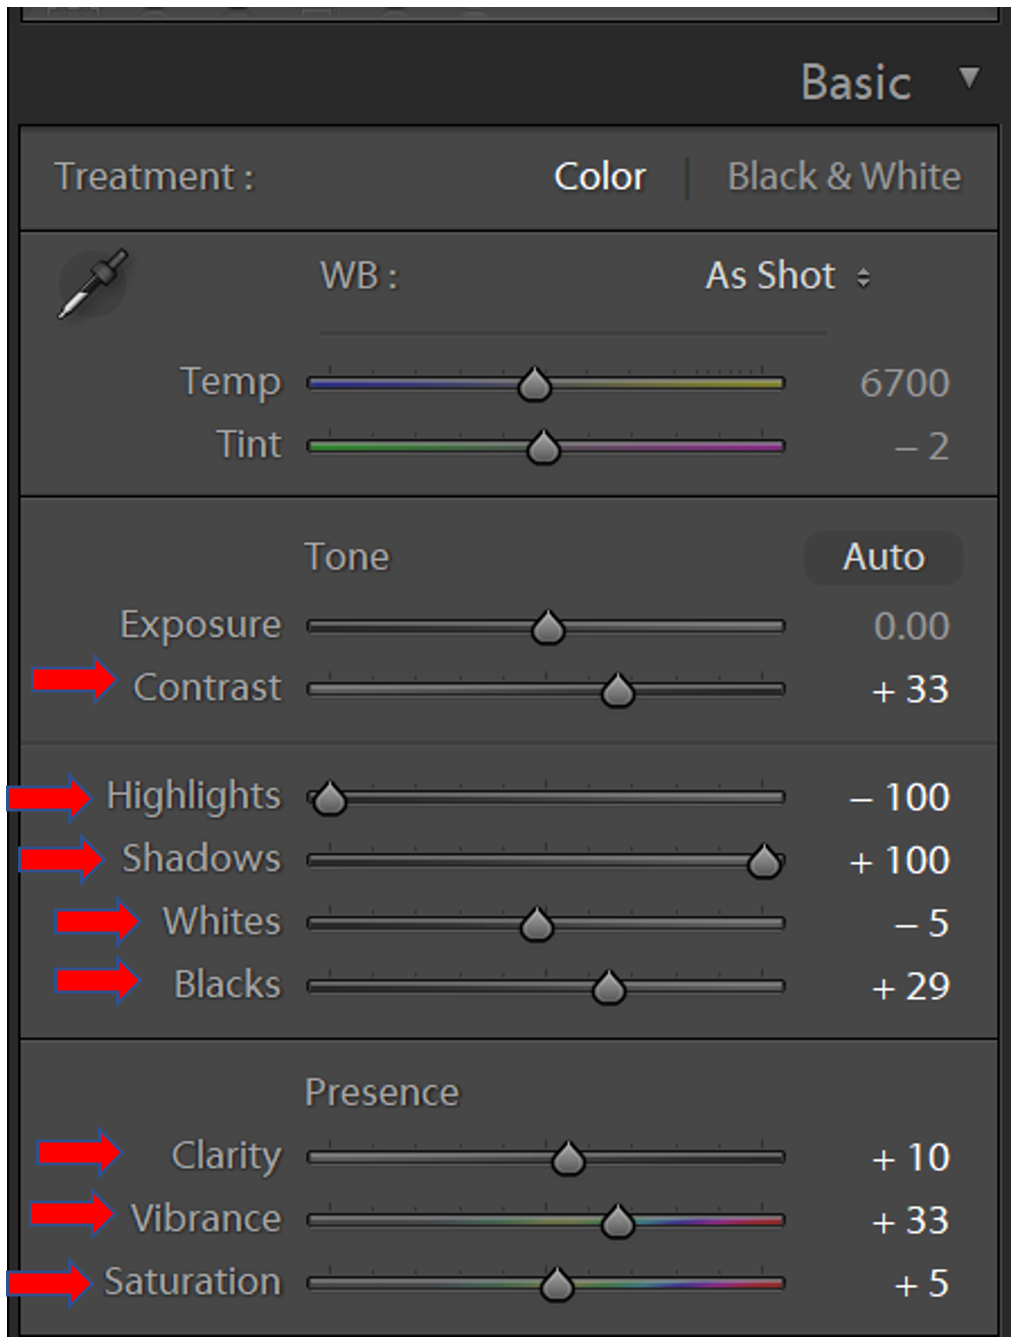


We could discuss each one of these in detail, but let’s just generalize for the time being that I’m bumping up the contrast somewhat, increasing vibrance, slightly increasing saturation, applying lens corrections, adding just a bit of clarity and dehaze, and, most importantly of all, starting the process of maximizing dynamic range by minimizing highlights and maximizing shadows.
Before we launch that dynamic range ship, let’s also explain “vibrance”—an unfamiliar term to many new photographers. Increasing "saturation" in an image uniformly bumps up the intensity of all the colors. Vibrance, on the other hand, is a smart tool that increases the intensity of more muted colors, but leaves the already well-saturated colors unchanged. You could analogize it as fill light for color intensity. It’s a much more subtle tool, akin to a scalpel compared to the saturation axe, and it provides a generally more palatable enhancement than an equivalent increase in saturation, which can result in garish and unrealistic colors.
Now, to that all-important dynamic range. You might recall that my blog post about shooting RAW emphasized the fact that the dynamic range available in RAW files is much greater than that found in JPEG. While using LR to improve dynamic range in JPEG files is completely attainable, its effect will be much greater with a RAW image. I italicized “available” above, because getting the absolute greatest dynamic range from the RAW image still requires the use of these tools. It exists in the file, but to get the full range that your camera captures, you still need to change some settings in almost all cases. Dropping highlights and raising shadows is the first step in that operation and so I’ve included it in the import process. But the real work comes in setting black and white clipping. That varies greatly from one image to the next and so is not appropriate for the import except in the minimal changes in “Whites” and “Blacks” that I’ve shown in the import Basic panel screenshot above.
We’ve done the first editing on all imported files effortlessly by letting LR do it automatically in import. How much effect does it have? Take a look at the two examples shown here.
The first is RAW SOOC (straight out of camera).
.")
And this one is the same image with the import preset applied.

We see subtle changes, nothing dramatic, but noticeable improvements would be my characterization.

Now we can really get to work. But before attacking dynamic range, there’s an important first step—if you’re using RAW; not applicable otherwise. JPEG shooters have in-camera color profile options that are automatically applied to the JPEG image. For Canon, they are listed in the LR Camera Calibration panel shown at right. In LR, the panel is all the way at the bottom of the Develop module panel. Nikon has a similar set of profiles with slightly different names. For RAW files, the camera does not apply these settings, but LR lets you do so after import using this panel. They can be set as part of the import preset, but I prefer to select one after the import because the one chosen depends entirely on the image itself and its subject matter. The selection should be made in LR before applying other dynamic range settings because those will differ depending on the profile used.
Which camera profile to use is entirely a matter of taste, and as the profile names imply, may change for subject matter. For the landscape images that are my primary stock in trade, I like to try Canon’s Camera Landscape, but most often use Camera Neutral instead. The landscape setting tends to intensify saturation more than I would like. If you shoot JPEG, you would see the same differences in your files as they come out of the camera, since the camera profile you’ve selected in the camera menu system is applied automatically.
Finally we get to the real meat of the matter, maximizing dynamic range. What we are talking about with that term is simply the amount of difference between the lightest and darkest areas of the image. That is most easily shown in the histogram for the image, which is available in real time while shooting with most DSLR cameras, and more to the point of our current discussion, at the top of the Develop panel in LR. If there is space on the left edge of the histogram, then there are no absolute black pixels and you have not achieved the darkest possible depiction of the darkest areas of the image. Conversely, if there is space on the right, then there are no absolute while pixels and the brightest portions of the image are at least slightly gray. That means the goal of getting maximum dynamic range can be achieved by raising whites to the right edge of the histogram and lowering blacks to the left edge. But! Big caution “but,” you do not want to take either end too far as that results in “clipping”—some dark gray areas are rendered fully black and/or some very light gray areas are rendered fully white. Either of those scenarios results in loss of detail in those areas of the image.

Fortunately, LR and the histogram give you the tools to get it right. The histogram SOOC looks like this for the Cattell Cabin image shown above. The blacks are nearly fully to the left. The whites, however could be raised considerably. After application of the camera calibration landscape profile, the histogram changes to the second example, which shows only slight color changes. The triangles in the upper right and left corners are not illuminated, indicating there is no clipping occurring in either the dark or light direction. The next move then is to raise the whites using the whites slider and lower the blacks with the blacks slider, as shown below. One operation at a time, of course. If you hold down the Alt (Options on Mac) key while doing this operation then clipping will be shown as color coded highlights in the image itself, and also by the respective triangle in the upper corners of the histogram. The goal in each case is to get the histogram as close as possible to each end without clipping.


In reality, the eye is accustomed to seeing deep blacks in shadows in a photographic image, and a small amount of black clipping is therefore acceptable. The eye is not accustomed to “blown out” or excessively bright spots, and white clipping should not be allowed to occur.
After these adjustments have been made, the whites and blacks settings and the resulting histogram are shown in the next screenshot. Note the illuminated triangle at the upper left corner, indicating a small amount of black clipping and that the corresponding white clipping indicator at the upper right corner shows no clipping there. But the histogram has been extended in both directions to the full extent of the dark-bright range.

That’s not all there is, but it’s enough for now. There is a lot more that can be done, of course, but these basic steps will make a surprising difference in the appearance of your photograph. The last graphic added below is the final resulting image of the Cattell Cabin with all the adjustments we’ve shown here and no others. I hope you’ll agree that the improvements are sufficient to make it worth your while to try them on some of your own photography. 